Courses
Codecs, formats and workflows course evaluation
Nov
Last week ended the “Codecs, formats and workflows course” organized by 709 Media Room. It is a 12-hour course, divided into two days (one of 4 hours and the other of 8 hours), dedicated to obtain a base of technical concepts related to recording and postproduction to be able to put them into practice when developing an efficient workflow.
It was taught by Luis Ochoa, colorist, dop, postproduction coordinator on projects for Avid Technology and with extensive experience as a trainer in multiple centers.
Currently (since the digital era) there are a large number of formats, codecs, media, etc. on the market that are distinguished by their own characteristics and/or belong to a particular manufacturer. Of course, there are tables that indicate each of their specifications, but it would not hurt to learn to differentiate the basic qualities of each of them.
This is precisely what the first part of the course is all about; getting the technical basics of high definition and digital cinema. For this, Luis talks about concepts such as sampling (422, 444); resolutions, Interframe and Intraframe compression types; transfer rate; HD SDI, dual link or HDMI connectors; clean or uncompressed signal; difference between Full-Raster and Thin-Raster; media types such as MXF, QT, AVI or RAW; and much more.

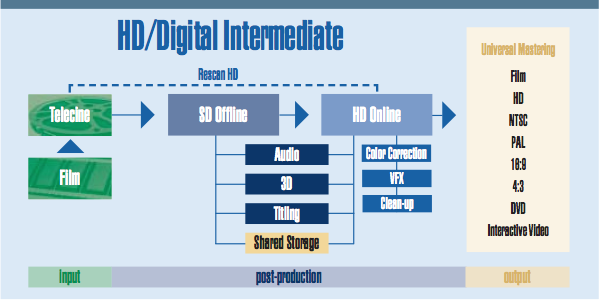
Depending on what our destination is (cinema, HDTV, internet or mobile devices), we will be interested in one workflow or another and this is a decision that should be made from pre-production. It is quite possible that the material will be recorded with different resolutions, or even with different aspect ratio (if we are using stock images, for example), or that we will have to perform a color space conversion, if for example we would like to create a DCP (since it uses its own color space). All these decisions are very important, and have a direct impact on the final image.
As I always say, the fact that 709 Media Room courses are not multitudinous establishes a much more personal relationship between teacher-student, leaving room for exclusive doubts of each one and even, at some point or another, to reach small debates about what is best for us in a certain situation. That is to say, we can solve real questions that happen to us daily in our work and we do not know how to solve; the course is not only focused on explaining a series of theoretical points.

The second part consists of how to work with all these elements, which ones to choose taking into account our project so that the material has the minimum possible loss during the post-production process, optimizing resources, costs and time.
One of the most extensive points of the second day was a detailed explanation of a table of codecs (recording, post-production and mastering). Point by point Luis explained their characteristics and their real virtues and defects according to his experience. We focused especially on ProRes and DNxHD as they are the most used in postproduction (as offline or even as output codec in some cases).
 And of course, in this same table appeared a topic that could not be missing if we talk about digital cinema: the RAW. Before explaining exactly how it works, Luis taught us some camera concepts such as ISO, white balance, A/D converter and sensor types. Then, starting with the difference between the operation of a dichroic block and a Bayer matrix, we got into depth with the RAW. The next inevitable topic was gamma curves: linear, logarithmic, pseudo-logarithmic.
Since the course is mainly theoretical, the class is supported by a whiteboard and a projector, where we could see how everything explained was reinforced thanks to all the documentation that Luis provided (and that the students could take home without problems). In the case of the RAW explanation, Luis had the DaVinci at hand to show us some images and physically manipulate their contrast to see how this affects color.
To finish with RAW, we talked about “developing” or debayerization; LUTs and Scene-Files (or Looks).

Mastering came at the end, as in any post-production process; making a brief introduction to the creation of DCPs (on which there is also a course).
During the last part of the course Luis creates some practical examples thanks to which we can apply all the knowledge learned during the course. The exercise consists in designing a working method starting from different native codecs to “go out” to different destinations. For example: If the recording codec is DVCPRO HD, what would be the possible workflow if speed, quality, or space on our hard disks is a priority and we want to go through an editing and color correction process?
Many times, when something is explained to us it seems that we have it very clear, but when it comes to the moment of truth, that is to say, the practice, doubts start to arise. Personally, I think this exercise is very useful to check if we really have all the concepts under control or to finish reinforcing them with the last questions.
The next edition of this course is scheduled for December 15 and 16. Here you have all the information about the course syllabus, prices, schedules and how to sign up.