Dec
From December 11 to 14 we continue with the DIT Course, organized by 709 Media Room in collaboration with Rafa Roche.
This second module consisted of learning camera operations by practicing with some of the most important cameras on the market today. It was taught by Rafa Roche, a cinematographer specializing in digital cinema and s3D with over 20 years of experience in the industry.
Tuesday 11
After learning all the theory in the first part of the course, with explanations about the different types of cameras, their circuits and the existing recorders, these days we moved on to practice, starting with the Sony F3.

With this camera we saw the functions of the menus, which although in other cameras change certain names, they usually have practically the same ones. Rafa explained the adjustments that can be made in the DSP cameras, which differ slightly in those that have the possibility of working in RAW, such as the ARRI Alexa. Step by step we observed the possibilities of the F3, with the user menu and some functions such as gain, gamma, detail, timecode and more.
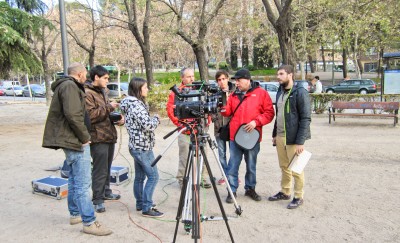
The first practice we carried out (the one you can see in the image below) consisted of provoking the “Rolling Shutter” effect and then avoiding it.

Wednesday 12
On Wednesday it was the turn of the Sony F65, a camera capable of capturing up to 8K resolution and working in RAW or HD. Because of this, we started to touch more in depth the “System Format” menu, which allowed us to choose in which format we are going to work and “Color Space”, for the gamma curves.
In order to correctly visualize the differences between one gamma curve and another, the first thing we had to do was to calibrate the monitor. Rafa showed us how to do it using SMPTE bars, adjusting first the brightness, then the contrast and finally the chroma. We also learned how to read the Astro monitor, in its different modes (waveform, vectorscope, parade).

In the same way as with the F3 (and with the cameras we would later use), we discovered and understood each of the menus, and with them we began to appreciate the differences between one camera and another.

After a few small tests on the Elfo set to handle these menus by ourselves and feel comfortable with the camera, we went out to the street to practice. As we still had the F3, we made some high contrast tests with both cameras, using backlit characters, exposure for skies or skins and seeing what was the maximum range that each one could give us.

We also tested high-speed recording by performing several practice runs with cars.
The Sony F65 uses its own card reader called SRPC-4, with which we started to see how to transfer the data from the cards to the computer and the first problems that we can find. Then we saw the F65 RAW Viewer software to start viewing the practices we had done during the day.

Thursday 13
On the third day we got our hands on the ARRI Alexa, a camera with much simpler menus than the F65 and a favorite of many users because it has a more cinematic look than others.
Examining the menus we came to another quite important topic if we talk about recording on cards, the formatting. Rafa explained the difference between the Quick Format and Erase options. It is important that we keep track of what we are doing with the clips we have recorded at all times, make sure we have dumped them correctly, and mark the cards with a code (color coded, for example) so that the whole team is aware of which cards can be used and which cannot.

With the Alexa we saw False Color for the first time, and we did a practice in which we first put this function on an assignable button, its “chop” of colors on another button, and then used them to help with the exposure, in this case, of a still life.
Then Rafa showed us how to use the ARRI Look Creator, an ARRI software that allows you to create looks (or LUTs) and import them into the camera via SD card.
Again, we went out to the street to test the camera with certain situations, modifying its ISO, shutter speed and using different types of lights, such as fluorescent lights, neon lights, car lights, etc.


When we returned to the set to see how our practices had gone, we learned how to handle the ARRIRAW Converter, another software that allows us to convert files from the ARRI Alexa. We also continued to talk about dumping, and Rafa gave us tips on how to be more sure that what we are copying is OK, mentioning some copying and file verification software.

Friday 14
And to finish the last day of the course, the RED Epic, one of the three RED cameras, whose most attractive feature is probably the 300fps it achieves.
The first thing we did, as in the previous ones, was to see menu by menu (through its touch screen) its features. One of the first options we found was the shutter, with differences between absolute or relative, very important if we are working with speed ramps.

We also saw from the menu the differences that arose in the image size if we modified the resolution and between the gamma curves (REDcolor3, REDgamma3, REDlog film).
And of course all these options had to be tested, so we did tests with different ISO and resolutions, and prepared a practice by exploding a water balloon and recording it at 300fps with variations in the shutter.

The next practice we did was with the HDRx (High Dynamic Range) of the Epic, creating a high contrast situation on the set and using different F-Stops to be able to see later the possibilities we would have in color correction.

To view all these images we use REDCINE-X Pro software.
Also, thanks to Ceproma, on Friday we had the opportunity to work with the Canon C500, the Canon 1Dc (first DSLR with 4K output) and the Gemini 444 recorder. Taking advantage of it, we did a practice on set, creating a situation and comparing the images of the RED Epic and the Canon C500, using the Gemini recorder to output the two cameras to a monitor.


Module II is the most extensive of the DIT Course, and is one of the most intensive, as it covers all the theory we gave during the first day, put into practice with all the cameras mentioned above. I recommend it to all those people who want to learn about current digital cameras, raw cameras, or technicians who already know about cameras but want to get up to date.

Here you can see the complete program and list of camera equipment used in this module, as well as all the information in case you are interested in the next course.
Merry Christmas to all! 🙂