Tutorials
I HAVE TOO MUCH GRAIN… I HAVE NO GRAIN… DECIDE FOR YOURSELF !!!!!
Apr
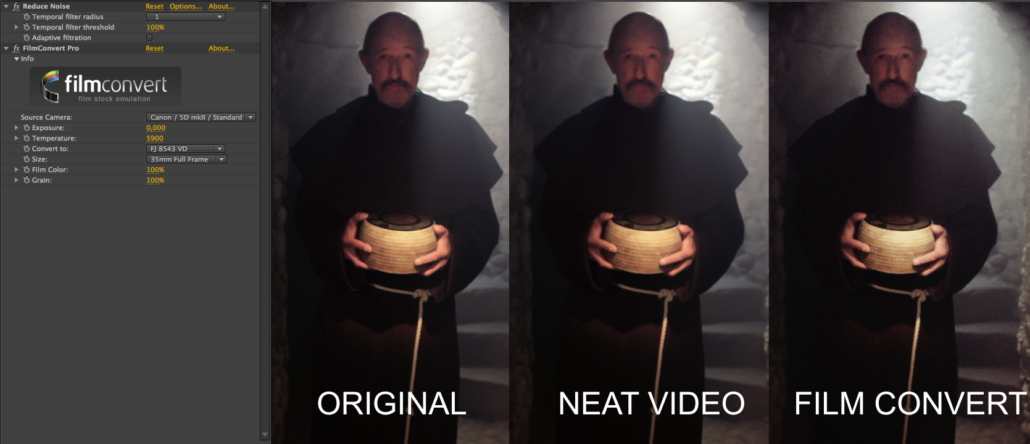
Yoyi’s analysis of NEAT VIDEO + FILM CONVERT plugin uses
After a previous article about FiLMCONVERT I will not add another unnecessary presentation of the program. If you don’t want to read it, just keep the basic idea that it is a simulator of the chromatic and grain level response of a series of celluloids. I can also simplify by saying that in general in Europe languages are spoken… you can speak them yourselves …..
NEAT VIDEO ($99) on the other hand is a plugin developed to very conscientiously remove noise/grain and with the permission of DARK ENERGY and MAGIC BULLET DENOISER, it has become the leader in this tiny market.
A priori they would seem to be two answers to opposite requests: I want to clean the image, I want to dirty the image…
The truth is that they are really two consecutive phases (first clean, then add) in all films of a certain postpo level that have opted for cheap formats in shooting (ACT OF VALOR or END OF WATCH would be paradigmatic examples of this process) as well as shows like WALKING DEAD (S16mm). These productions use this dual process to clean up the shots for compo/metal and then with a bit of magic and pixel dizziness (Thanks NYQUIST!!!!) they get the image to give us a feeling of higher resolution than a S16mm/DSLR would normally have when viewed in HD.
In fact, the plugin/program DARK ENERGY encompasses both phases within itself (unfortunately I don’t have access to it at the moment to show it) as a system to prepare the footage before starting the color correction phase. If you are not convinced that this is of any use I think I can convince you later in this article, but keep in mind that DARK ENERGY is an expensive program (it has been around 6.000€, future plugin in AE) and that it used to be an ARRI exclusive process (the Germans are serious people to make them spend money on nonsense) known at that time as RELATIVITY.
If you want a guy with a strong German accent to explain it to you in English here is a link
You have a demo also in this link (third end of the video)
Wait a minute! I insist! Wouldn’t this be like taking a step to the right and then taking a step to the left and staying in exactly the same place?
Ainsss! the basic idea is that the grain/gain applied by the camera has a low resolution (lower than that of the camera itself), often with electronic colors, inconstant, RED/BLUE duotone, due to the 4:2:0 subsampling, making it more strident and “coarse”. The presence of noise will generally be only in the dark areas (as opposed to the chemical format, which usually has a lot of noise in the high areas).
If we clean the image (trying not to lose resolution by filtering) and then apply the S35MM grain raster as input we will gain a false sensation of higher resolution (that of the s35MM) and we will also have eliminated defects associated to the low quality of the codecs, being the perfect hiding place for many of the technical defects of our image. I remember that the first time I was aware of this was when kinescoping some of the first shorts/films I made as a colorist, my surprise was always great when I realized that the emulsion magically always made the footage look better than on my monitor, being desirable for the DVD release to telecine this positive and compress instead of going directly to my digital master. With the disappearance of the photochemical medium on display, there is still a need for a high quality DITHERING generator that can hide all our sins and this double process would be its contemporary equivalent.
DITHERING, NYQUIST and other words I leave them for you to look them up in wikipedia

Understood?
Back to NEAT… I summarize: It’s cool, it’s cheap, it’s not too slow, you can install it in almost any application. You can analyze areas of the image looking for the grain pattern that is messing up your image, if you are lazy it analyzes the image for you, you can save presets and examine if the grain appears more in one color or another, as well as in darker or darker areas. You can use frame comparison to determine what is grain and what is image (Temporal Filtering), as well as apply a subsequent Sharpening process at HIGH/MEDIUM/LOW frequencies to compensate if you have lost some resolution in the process. If you don’t have it, buy it, it will get you out of more than one trouble in indie projects.


If you can combine it with FILMCONVERT it will facilitate the work prior to a demanding color correction session.
If you have DARK ENERGY you have money (and a Windows PC) and surely everything I have said in this article you already knew.
Best regards, Yoyi.
P.S.: I take a vow of chastity and I will not write any more tutorials about Davinci until I see feedback. I want to see operators contribute ideas and presets to enrich the Spanish-speaking user community.
Note:
The footage that accompanies this article corresponds to an ad of mine with 5D. If you are curious you can see it at this link
Acknowledgments:
The guys at Nómada Media have been generous enough to let me use their FILMCONVERT license for this and the previous article.