Apr
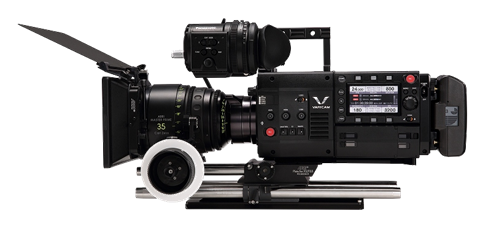
After Rafa Roche’s great explanation of the Panasonic Varicam 35 and its most important options in the first part of this review, it’s my turn to talk about workflows and color correction processes with the camera’s material. I will try to be brief and focus on the most useful and important aspects.
In-camera color management
The first thing that strikes you about the camera is the color management it has between camera and postproduction. The camera is connected to a color correction system on set (we used Livegrade in the tests) to be able to do live color grading and then manage those corrections through metadata (CDL or Lut) or recording in the secondary codecs that the camera generates. What did I mean by this? Let’s go step by step after seeing a graph of Panasonic’s operations:

We connect the camera to the computer to be able to remote the color correction, that is to say to make color correction on the computer and to see it in real time on the camera (there is a delay of a few seconds but perfectly acceptable). In this sense, as Rafa mentions in his article, he emphasizes that the connection is via wireless using a wifi network that the camera itself generates. So there is no need for cables between camera and computer.
Step 2. Once we have made the color correction we choose (normally starting from the material with Vlog) we can indicate in camera that the SUB and PROXY codecs go with that correction applied. In this way we will be sending to editing the dailies already “linearized” instead of “washed”, likewise the copies for review by the director, director of photography, etc. could also come out of these files so that they are also corrected. The MAIN codec would remain “virgin” color corrected, i.e. in Vlog and Vgamut. We have performed these tests using AVC INTRA 4K 444 as the MAIN codec, but expect that when the Panasonic Vraw RAW codec becomes available the flow will be very similar.
Step 3. From the Livegrade color correction station we can send these corrections in the form of metadata (CDL or Lut) in case they would be used during the final color correction process. Here I have to say that although this possibility is very suitable, in my experience we rarely start the final color correction from this type of files generated in set. Keep in mind that the most important thing in the final color grading is the overall mood of a sequence, so we work matching different shots and cameras, not shot by shot as it would be done on set. In addition, of course, we are assuming that the set and postproduction monitors will be correctly calibrated and the shooting visualization environments suitable (which is sometimes very complicated). However, of course, all these references sent from the shooting are very useful to see as accurately as possible where the visual sense of our work is heading.
You have some files so you can try these processes yourself. You can download from here some clean MAIN and SUB and PROXY clips with a “discreet” color correction applied (mostly so you can see that we are doing something on the image). In the package are also included the Lut (.cube and .dat) and the CDL of the correction so you can apply them to the MAIN clip and compare them with the others. In our tests there was a very slight difference between the application of the correction from the camera to the SUB and PROXY files and the application in DaVinci Resolve of the Luts or CDLs to the other clips, totally acceptable in a normal color correction flow.

As mentioned above, the tests were carried out with Pomfort’s Livegrade, but also available as live color correction software are Assimilate’s Scratch Lab, Blackmagic’s DaVinci Resolve, Codex’s Review, Colorfront’s On-Det Live and Filmlight’s Baselight Flips, according to the information provided by Panasononic.
It is also worth mentioning that the current version of DaVinci Resolve 11 allows exporting color corrections generated as Lut for the Varicam 35 (Vlut) camera.

To finish this chapter I would also like to say that the camera has color controls to perform a basic correction based on CDL adjustments (offset, power, slope and saturation) from the camera itself, without using external software. Although a priori it does not seem to me the most comfortable option having described all the above, it is true that at a given moment it may be useful to write some parameters in camera to facilitate us from the DIT or postproduction station. Something like some numbers for the shooting lights that the director of photography gives to the lab for the positive copies.
Workflows

As we have already mentioned, the camera can record several codecs simultaneously, a main codec (MAIN), an offline codec designed for editing and dalies (SUB) and a very low weight codec for possible uploads to the Internet (PROXY). In addition, if the Codex recorder is built into the camera, it can record as a fourth codec in Vraw, Panasonic’s RAW codec. As the latter is not yet available we will focus on the tests carried out with the rest. Mostly MAIN and SUB
Backup copies on the run-in
To check the footage on set and make backup copies of the material we can use any of these free software: DaVinci Resolve Lite 11.2, Assimilate Scratch Play 8.1 or Panasonic’ s own P2 Viewer Plus (it will ask us to install the P2 drivers first). P2 Viewer plus is currently the only program that can correctly view the files recorded by the Varicam in high speed (and of course the rest of codecs).

Edition

For the tests we have used Avid Media Composer 8.3 as editor (the latest version available at the time of testing). If we download the latest version of the Panasonic P2 plugin for Avid AMA we can work with the AVC INTRA 100 (100Mb/s 1080p) files generated by the camera in SUB.
Important note: Not all combinations between MAIN, SUB and PROXY codecs are possible, in the first part of the article you have a table with the relationships but I warn you of a fact. When recording AVC INTRA in 4K DCI resolution (4096×2160) as MAIN codec you can only set as SUB codec an AVC INTRA 2K (20148×1080). Currently AVC Intra 2K and 4K codecs are only read by DaVinci Resolve 11.2, so the codec you have recorded as SUB for editing could not be used in Avid, FCPX or Premiere. Until the editors recognize AVC INTRA 2K and 4K my recommendation as a workflow would be to record the MAIN codec in AVC INTRA 4K UHD (3840×2160). If we record at this resolution the MAIN automatically sets SUB in AVC INTRA 100 HD 1080p, codec widely supported by editors for years. This is due in my opinion to the fact that Panasonic uses in the AVC INTRA 100 the MXF OP Atom capsule (which it has been using for many years) and for the AVC INTRA 2K and 4K codecs it has migrated to the MXF OP 1b. This MXF OP 1b allows to encapsulate video and audio in the same file, unlike the OP Atom that needs separate MXF for audio and video. Surely soon all post-production programs will understand codecs and capsules.
The first thing I notice when ingesting clips using AMA in Avid is the amount of metadata that appears as columns in the bin:

It is worth noting that I observed more information in this ingest mode in Avid than when viewing the clips from the Panasonic P2 Viewer Plus viewer itself, which we have already discussed.
I have selected the mink of a few columns but there would be many more. The advantage of such metadata-rich imports is that editors can report potential problems by having access to information about ISO, white balance, gain, gamma and gamut curve or even camera serial number (think of a multi-camera shoot where one of the cameras may be faulty).
Here are some more metadata columns that could be displayed from Avid of the material:

If we have “ironed” the set color corrections in the SUB codecs the editors will see the corrected material and if we have decided to leave the SUB clips clean we can also send the Luts from set to be applied in editing (currently Luts can be applied without problems in Avid Media Composer, Premiere or FCPX), Premiere or FCPX) In my opinion it is not convenient to work in editing with the material “washed” logarithmic, because the brain gets used to this look and when we have to take it to the common color gamuts (709, P3, etc) it may seem that we are saturating it too much. This is a normal effect that happens to directors after spending a long time watching logarithmic.
An important detail is that the AVC INTRA 100 HD codec, as its name suggests, has Intraframe compression so it is perfectly suitable for editing processes, in fact it is widely used as an online codec for high definition. Therefore, unless there are other reasons in the workflow, it is not necessary to transcode to other intermediate or “edit friendly” codecs such as Apple’s Prores or Avid’s DNXHD.
Once the editing is finished we will have two possible workflows:
Send an AAF, EDL or XML (depending on the editor used) to the color correction program to conform and color correct the MAIN clips (AVC INTRA 4K, 2K or in the future Vraw). If we have received the Luts independent of the material, we can send them to the color correction stage to serve as a reference.
2. When the editors support the MAIN codecs AVC INTRA 2K, 4K we can conform from the editor itself against these codecs so that we have our timeline with all its cuts, tracks and effects linked to the material in high. Once this is done we export a clip rendered in AVC INTRA 2K or 4Ky (our MAIN codec) an EDL to the color correction program. The colorist will use that EDL to automatically cut the rendered clip and will not waste time conforming effects and timecode (since everything has already been rendered in high). This workflow DaVinci Resolve calls “preconform EDL” and is very suitable in fast workflows (like TV series) when working with high quality processed codecs in camera. It has its limitations but saves a lot of time over the traditional XML, AAF or EDL conform process. Both Adobe and Avid. Apple and Grass Valey are planning to support AVC INTRA 2K and 4K codecs in their editors.

Color correction
Whether we send an EDL, XML or AAF from the editor or if we use the flow described as “Preformed EDL”, we will find ourselves in the color correction program with the highest quality material captured by the camera or we have decided in our workflow (nowadays it will usually be AVC INTRA 4K 444).
For the tests we have used DaVinci Resolve 11 because, as mentioned above, it is currently the only software that supports the AVC INTRA 4K 444 AVC codec, but it is expected that soon the main color systems will support it: SGO, Quantel, Filmlight, Adobe or Assimilate, among others.
The first impression when shooting with the Vlog curve is a very decontrast and desaturated signal similar to other cameras with gamma curves based on the Cineon standard. To compensate the image a simple primary adjustment is sufficient and the full dynamic range of the camera is exploited. If this adjustment is made with the traditional Master Lift, Gamma and Gain controls, the image will also gain saturation and this must be adjusted very little after the contrast correction to get a “normal” image. In other words, you will notice that if you use Lift, Gamma and Gain as primaries for the first contrast adjustment you will have to touch the saturation control very little afterwards to get a “normal” image (obviously the desired contrast and saturation setting will depend on the image of the final work).


You have for your own tests camera files with which you can measure the dynamic range in real situations, you can download them from our “Best of 709” section (previous registration required).
As expected one of the most interesting features of the camera is the possibility of DUAL ISO 800 and 5000 native ISO. As Rafa already explains in the first part of the article the sensor has a double ISO at these sensitivities, so that when working at 4000 ISO a large amount of noise is observed (we are applying gain to the sensitivity of 800) that disappears almost completely when switching to ISO 5000.

As noise is one of those difficult things to evaluate on static frames we leave you some original camera files at 800, 4000 and 5000 ISO so you can see for yourself how the camera works.
During the tests Rafa Roche pushed the camera to the limit by recording a scene with only the light of a cell phone.

Lastly in this section I would like to talk about the skin tones that the camera gives naturally. It is the traditional warm and natural tone of Panasonic, in shots with a neutral lighting I have not noticed strange dominants in the skins nor have I had to make an effort to bring the skins to beautiful tones, in a natural way the camera sensor works very well these important colors.

As in other tests you have for your own use files with neutrally illuminated skin tones, you can download them from our “Best of 709” section (registration required).
Conclusions
The camera’s intelligent and flexible color workflow has been one of the things that has struck me most positively, especially the fact that you can remote color correct wirelessly. I think that for pre-visualization of looks in TV series and feature films this could be very interesting. As I have already commented personally I don’t think that these corrections can be used for the final color correction as the definitive ones, but they certainly help a lot in the communication between departments.
On the other hand, the offline-online workflow seems simple and stable to me. If we work as MAIN codec in 4K UHD (very suitable even if our final output is 1080p as both have 16:9 aspect ratio) we will choose as SUB the AVC INTRA 1080p, codec widely accepted even as online codec for high definition. There is no need to transcode to intermediary codecs such as Prores or DNXHD. In addition, the PROXY generated by the camera allows quick uploads to the internet for shot review.
And finally speaking of the codecs in color grading, they have proven to be robust and stable when manipulated in DaVinci Resolve. I haven’t encountered any difficulties, artifacts or strange dominants when taking the materials to neutral tones or forcing the most extreme looks. In this sense, the VRaw material will certainly offer us even more leeway when going to the big screen.
The skin tones are beautiful from the start, the dynamic range is more than sufficient for most of the shots tested and the fact that the double ISO makes color correction much easier in extreme low light conditions (without being miraculous of course, you have to keep lighting).
As the Vlog is based on Cineaon like those of other manufacturers it should be no problem to match this camera to an Arri Alexa LogC, Sony Slog 3 or Canon Log, which of course is an advantage at the moment when we find ourselves full of different cameras in every production.
As the color grading is fast and with enough margin (along with the rest of the features) I see this camera very suitable for use in TV series, commercials or feature films. Surely when the VRaw recorder arrives we will be able to get even more out of the camera in productions with strong VFX or extreme color corrections.
Update April 2015: After NAB there have been improvements in the support of AVCINTRA 2K and 4K codecs by editing and color software. You have all the news in this link.
Author: Luis Ochoa