Jul
One of the new features of the Avid Media Composer editing system is Spanned Markers, markers that allow you to mark a space of time instead of a specific frame, as the original “markers” or “locators” do.
A similar function called“Mark Markers” has been available for some time. After placing several markers on the same clip (as many as you want to set as In and Out points), if you position the cursor between two of them and press the “Mark Mark Markers” button, the previous and next markers will become In and Out points.

Now, with the arrival of Media Composer 7, Spanned Markers come into play, capable of working on source clips or sequences, even though the Avid documentation states that they can only be applied to sequences. In fact, it is probably in the Source monitor where we will find them most useful.
How to use them?
The first thing to do if we want to use Spanned Markers (in sequences) is to add the normal (original) markers button to the sequence monitor or timeline (by default, Avid positions them only below the Source Monitor).
Then you have to set an In Point and an Out Point, thus delimiting the space of time you want to mark. On Mac, to make these points become a Spanned Marker, press Option while pressing the Marker button. On PC the key combination would be Alt + Marker.
Normally Avid tries to make our work as easy as possible and tries to keep the use of the mouse as low as possible. Therefore, if you assign the Marker button to a keyboard shortcut and press the key + Alt/Option at the same time, you can also get the function.
Another option is to create Spanned Markers using the Command Palette and going to the More tab.
Properties of Spanned Markers
The Spanned Markers have some qualities that we must know and take into account in order to make our editing more efficient. The first thing is that, within the Markers tool, they appear with their specific icon and it is possible to jump from one to another visualizing the beginning of each one (we will not be able to see until the end). If we want to go from one to another in the timeline, we must know that Avid will only recognize the beginning of the Spanned Marker, not its end.

An added change in Avid version 7 is that now, whenever a marker (of either type) is added, it is automatically named using the user’s name by default, instead of remaining blank as in previous versions. Of course, this name can be changed for both normal and Spanned markers, as well as their color.
Another factor to take into account is that they are not transferred from the Source Monitor to the sequence, although normal markers can do it if we have configured it this way in the user preferences. In addition, they cannot be overlapped and it is not possible to use them to set in and out points as in the “Mark Markers” function explained above.
Since Spanned Markers relate to the timecode track and not to the video and/or audio tracks directly, if you have a Spanned Marker on a section of your sequence and you move it, the Spanned Marker stays in the same position. This might be good for certain actions but hopefully soon Avid will add the option to work both ways.
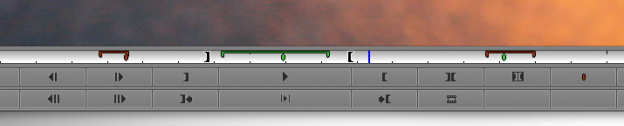
Spanned Markers can be displayed above the timecode and at the top of the timeline; however, this is only true for sequences, if we switch to the Source display mode they will not appear.

These types of functions are very useful when we want to select segments of the material, for example, if there are several parts within the same clip that we would like to include in our edit or mark them for later review. Regardless of the use of Spanned Markers, it is clear that they are a good way to quickly and visually identify segments of a clip or sequence.
* Original source: http://provideocoalition.com/shullfish/story/mc-7-is-out-what-avid-wont-tell-you-about-spanned-markers1