Nov
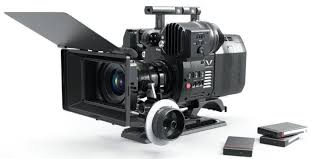
At 709 MediaRoom we have been testing Panasonic’s new camera for cinematography: the Varicam Pure. Tommie Ferreras, director of photography, and Luis Ochoa, colorist, have been in charge of the tests and present their results in this article. Our sincere thanks to Panasonic for lending us the material and for their sustained support to 709MediaRoom.

Varicam technology

Varicam Pure is an evolution of the Varicam 35. A model aimed directly at the cinema market: cinema for theaters and quality fiction series.
A distinguishing feature of the Varicam is that it has a dual sensor, i.e. with a double native sensitivity: ISO 800 and ISO 5,000. This is something that no other camera on the market has. The Varicam family of cameras that share this technology are the Varicam 35, the Varicam LT and the Varicam Pure.
The Varicam 35 was the first to hit the market; then came the Varicam LT, smaller in size and lighter; and finally, at the top of the range, the Varicam Pure, ready for 4K RAW workflows.
The three models have the same sensor and camera body and differ in signal encoding characteristics and recording standards. The Varicam Pure incorporates a recorder manufactured by Codex that provides the guarantees of this leading company in top quality recorders. It uses Panasonic’s own codec: the V-RAW 2.0, which works at 12 bits up to 30 fps and at 10 bits up to 120 fps. For 4K SDI output, it uses four 3G SDI cables. This output is also available on the Varicam 35, but not on the LT version. An HD output is available for monitoring.

| Specific features of the Varicam Pure |
| Internal recording in 4K RAW without compression |
| It has a proprietary codec called V-RAW 2.0. |
| 10-bit – 12-bit coding |
| Maximum frame rate 120 fps |
| 4K output over 3G-SDI (Quad SDI) |
The camera body, excluding lens and battery, weighs 2.70 kg and the Codex recorder 2.45 kg. The dimensions are 31 cm x 23 cm x 18 cm.

Varicam Pure is a different camera, with its own character and look that is unlike any other sensor on the market. It has a number of features that make it special: the dual sensor (dual ISO 800-5,000 sensitivity) that creates a unique texture, a color science that has some continuity with the VARICAM series, an improved in-camera colorization system, a proprietary RAW codec, etc.
The most characteristic thing about this camera is that it creates a texture/noise that has no pattern. It is random, and with a certain density if you look for it. Like film. The image it gets is reminiscent of classic Kodak black and white Tri-X film because it has that density. It has a completely different look as we pointed out back in the day in the different tests we did with the Varicam 35 ( Varicam 35 Test, Varicam 35).
The sensor of the Pure is the same as that of the Varicam 35. They have made no variation on this, because the people who like the camera, like it a lot. As there may also be people who don’t like it, but we are advocates of this camera and this sensor precisely because of that.
It has a menu that allows you to minimize random noise as much as possible if deemed appropriate. For example, with images with a large shadow area. This function to enable noise reduction can be turned on or off as desired.
One of the features we liked the most is the powerful logarithmic image it generates. With the Varicam’s gamma curve, almost 14 real f-stops of latitude are reached and images with great detail and high contrast are achieved in complex situations such as very clear skies or areas of stubborn shadows. Working with this sensor outdoors at night in the city is a delight.


It is a very particular logarithmic image. Generally we tend, by comparison, to look for a look similar to the ARRI models that are excellent and it is not that it is an antagonism of these, but it has other virtues, if you want to go for another type of aesthetic. It also has some texture in the color. The LOG curves have a wide range in the middle and low areas and that is where the most important differences between some models and others become visible. At high settings, the performance of this camera is in line with sensors capable of HDR work, although it could stretch a little further in this area.
The sensor
The sensor is a 27.784 mm diagonal Super 35m CMOS and its most notable feature is the dual native ISO 800 and ISO 5,000 sensitivities, with very low noise levels at ISO 5,000. From either of these two base settings, variations are possible: from ISO 800 base of 200 to 4,000; and from ISO 5,000 base of 1,250 to 12,800.
It has 10.3 million photodiodes of which 8.9 million are effective pixels, a resolution suitable for 4K.
In order to achieve Dual ISO, they considered it more convenient to design the sensor with Rolling Shutter, like other high-end models on the market for digital cinematography. However, in our tests we have found that it does not have any of the movement defects characteristic of the Rolling Shutter of low budget cameras. In fast movements, whether internal or external, vertical lines and horizons are perfectly maintained.
The following table shows schematically the characteristics of this particular sensor:
| Varicam Pure sensor features |
| Super 35 CMOS; diagonal: 27.784 mm; 4K – 4096 x 2160 pixels |
| 10.3 M photodiodes 8.9 M effective pixels; 6 x 6 micron photodiodes |
| Rolling Shutter |
| Native ISO 800 / 5,000 |
| Aluminum PL mount |
| ND Clear Filters- 0.6 – 1.2 – 1.8 |
| IR filter on the sensor |
| Dynamic Range 14 near-realistic f-stops |
Black balances are also a very interesting utility of this camera. I recommend doing them in special situations, such as every time there is a sudden change in temperature, a change in frame rate or even when there is a change in shutter speed. This avoids an excess of ugly noise in the shadow areas. It is also advisable to do this at the beginning of each day.
The camera head also has a low-pass filter that drastically reduces infrared. This filter, in the LT model, can be separated from the sensor giving rise to curious images, as well as increasing the dynamic range by almost 1 f-stop, among other features. In the Varicam Pure this possibility has been discarded, although in my opinion, it does not hurt to be able to perform this gesture as long as it is simple and safe.

The camera has three neutral filters (0.6; 1.2; and 1.8), in increments of 6, to adjust, which is fine. Practically with one ND3 glass filter you can get all possible combinations. In general, I like to put less glass in front of the camera: the less glass, the lower the weight, the more manageable it is, and it avoids the double image and ghosting effect in high brightness situations. The cleaner and cleaner the image from the sensor, the better expectations.
Dynamic range
We have also done dynamic range tests with a chart and checked 14 ‘almost real’ f-stops. You can see from the chart that level 15 is already almost glued to the black level, but at 14 some detail can still be brought out. Although this is on a chart and in reality, the extremes can hardly be reproduced or at least in the same controlled conditions as in a test.

Dynamic range is the resulting balance between highlights and shadows. Achieving a large number of tonalities is equivalent to obtaining a photographically powerful image. In the Varicam we can say that the dynamic range is very weighted giving priority to the intermediate and low zones that together with the great sensitivity allows to obtain that look so characteristic of this equipment.
The design of the V-LOG gamma curve helps to retain this capability in both highs and shadows.


Color stability in low light is one of the workhorses of many cameras. When you expose in low areas there are colors that lose a certain consistency, a certain chromaticity. In clothing, or if you’re working for example in a circus, or in a low key light environment, you notice that those vivid colors lose credibility. Well, with this camera they are somewhat maintained. It has an interesting stability in that sense.
To achieve interesting volumes and dimensions, to compose a complex visual structure from a simple one, or vice versa, is the objective. The same is true of providing the image with a base that allows it to be enriched or perfected to show its full strength. In this sense, it is necessary to know very well the behavior of a sensor, to know what is appropriate at each moment and to squeeze its limits.
I advise with this camera to overexpose between 2/3 and 1 f-stop, although every cinematographer has his own style and habits, I like to overexpose for several reasons. One of them is the little noise that you can get and that remains there latent. With a little overexposure it is considerably reduced. In a first correction of primaries the noise disappears and you don’t need to enlarge with a denoising tool. In the different color softwares there is a great variety of noise reducers that can be applied. But the first thing is always to get a correct and balanced exposure. That is the beginning of the magic.
Another reason for overexposure is to give more body and breadth to the image and therefore a significant texture, thereby increasing the information in the picture. Depth of field also plays a role.
In the following images you can see a test environment in a scene with a dynamic range of 9.5 f-stops. On the RGB waveform monitors you can see that, with an overexposure of 3 f-stops, it clips in the highlights.


The V-RAW codec
Panasonic’s V.RAW codec is also different from that of other manufacturers. We could say that it is a RAW that is cooked ‘to the point’. Not all RAWs are the same. Panasonic’s V-RAW does not allow you to change the gamma curve, as is the case with Red’s, for example. When working with this camera you can only use the V-LOG gamma curve. It is also true that the quality of the signal at 12 bits with 14 f-stops of dynamic range is no limitation, even for 4K mastering in high dynamic range in any color space, no matter how large it is. But the gamma curve cannot be touched in camera or in post production. Nor does it allow you to vary the white balance or ISO in postproduction. The values assigned in camera are the ones that will be used for development. Here the values you set in camera are the ones you will find in postproduction, as with a ProRes or AVC processed image codec. This is important to know for workflow definition.
As for high frame rate recording, it goes up to 120 frames per second, which is very impressive considering it is a 4K RAW codec. However, at 48 fps and above, the bitrate is reduced from 12 bits to 10 bits.
In the following images we can see how the original V-RAW camera files (.vrw frame sequences) are understood by DaVinci Resolve as if they were DPX sequences. This is because Resolve encounters a sequence of frames that, although they are RAW, do not allow any kind of developing or debayerization adjustments. No adjustments can be made in the ‘Camera RAW’ menus of the Resolve color room as shown in the second image. All metadata corresponding to resolution, bit depth, etc. are correctly interpreted.


Monitor signal colorization
 The options for adjusting the color and contrast of the monitoring signal are also very powerful. Already with the Varicam 35 it was possible to connect the camera via WIFI to external color correction software such as LiveGrade Pro. The Varicam Pure also incorporates it, but, in addition, it allows to load LUTs in the camera and edit them in Slope, Offset and Power values. We found this to be a very interesting improvement since it allows us to work directly on the camera without the need to connect any external device. In many occasions it is more operative to load a LUT in camera and forget about it. The advantage with the Varicam Pure is that you can edit this LUT, in the camera itself, to adapt it to the different situations that arise in the shooting. Of course, the WIFI remote control functionality is maintained in case the DIT on set wants to make the adjustment from scratch with a ‘live grade’ system.
In DaVinci Resolve we can find all the support to work with Panasonic codecs and specifically the V-RAW 2.0 codec used by the Varicam Pure. We can also extract a LUT generated specifically to do the on-camera monitoring with the appropriate correction for our project.
We did a complete test of this procedure.
- First we took a test shot and imported it into DaVinci. We made the correction and exported it in the ‘Panasonic VLUT’ (.vlt) format.
- We then import this LUT into the camera and apply it to the monitoring output.
- Finally, we found that this LUT could be edited in the camera’s menus with Slope, Offset and Power values, which allow us to act on shadows, midtones and highlights.
In the following image we can see a screenshot of the DaVinci interface for exporting the LUT in the ‘Panasonic VLUT’ format.

Color science
From a technical point of view the camera uses a specific Panasonic color gamut called V-Gamut which is wider than the BT.2020 Gamut and of course the DCI-P3 Gamut. Therefore, with this camera there is absolutely no problem when mastering in high dynamic range (HDR), both for ultra high definition (BT.2020) and cinema (DCI-P3). In addition, the camera comes ready for ACES workflow that can be used on set with ACES Proxy, or in post production as we will see below in depth.

Digital cameras are starting to be like film emulsions: each camera has a special character and gives a particular color. In the case of Panasonic, the characteristic features are the warm tones that give a very soft result on the skin. They are very correct and very warm skin tones that almost do not need to be forced in color correction. That is to say, just by putting the signal in place, normalizing it, the skin tone is placed in the right place.
Of course, being an uncompressed 4K RAW codec, there are a lot of possibilities in color correction to turn the material around, if necessary. You can do it all, since you have 14 f-stops of dynamic range with a very wide gamut and 12-bit encoding. It’s an ideal workflow for HDR mastering.
In a RAW codec the debayerization, or developing, is responsible for the interpolation of the photodiode information with R, G and B information to give the ‘true color’ of each pixel (the sum of R+G+B in the proper proportion). Depending on the number of original photodiodes and the debayer process there may be slight ‘offsets’ or mismatches between the three colors, resulting in edges that are not properly defined. This camera minimizes this artifact.
Workflow
The Varicam Pure’s workflow is very cinematic. The options offered by the Varicam 35 to generate higher or lower quality proxies, such as visualization material, dailies or montage material, with the Varicam Pure are done off-camera. Only the V-RAW codec is recorded in camera. The material has to be entered into software in order to generate dailies or transcodes of the material for off-line editing. Panasonic recommends using the Codex tool, ‘Codex Production Suite’, but you can perfectly well use DaVinci Resolve or any other system that supports V-RAW. Then you will have to conform to sync with the source material in color correction. It’s a very simple workflow. It is not intended for daily television, although it could be for high level fiction such as series, or as a modular workflow. Here the source material is RAW and the proxy creation is independent.

In our tests, for the assembly of the part we dumped the V-RAW raw to DaVinci Resolve and generated ProRes LT proxy files with the LUT applied that we had previously used in shooting. Once the off-line assembly was complete , we conformed in DaVinci Resolve via EDL against the original V-RAW media. We exported ProRes 4:4:4:4-12 bit and DCP files of the finished pieces with graphics and VFX.
The V-RAW codec offers two frame size options, 3840×2160 and 4096×2160 and two quantization options, 10-bit or 12-bit. The use of 10 or 12 bits is determined by the frame rate per second. As long as you are working with a standard frequency (up to 30 fps), you can choose 10 or 12 bits. But with higher frequencies only 10 bits can be chosen. The following table shows the recording capacity in minutes of a 2TB Codex card.

Our recording was at 4K DCI 4096 x 2160 to finish in DCP Scope 1:2.39.
Formats for material exchange in ACES
We were also testing formats for material exchange to link the color correction and visual effects (VFX) departments. The objective of these tests was to find the best way to exchange material using the ACES color space and with linear gamma. So that both VFX and color material could be seen in the same way, with the corrections and effects that each one contributes, always maintaining the maximum quality of the material.
Color and VFX tests were carried out in DaVinci Resolve at La Bicicleta ‘s facilities in Madrid.
In DaVinci Resolve we used the IDT provided by Panasonic and a 709 ODT to normalize the image. In the Autodesk Flame post production system we used the same input and output transforms. So in both rooms the material was looking exactly the same.
A LUT was used to send color corrections to post production that could be used as a reference. Both a normalized image and an artistically corrected image were displayed the same in Flame and DaVinci Resolve. And to exchange media we used OPEN-ERX 16 bit linear. We were testing also with DPX 16b but we detected some errors in the transformations. If ACES standardizes OpenEXRs, it will be for a reason!
BBC, NETFLIX, DISCOVERY, AMAZON Studios among other companies and Broadcasters have adopted Panasonic for its technical characteristics as one of the brands they work with in their productions, there are other brands that share these same credentials, but it is important to know that it is there.

Working with ISO 5,000
The dual sensitivity, ISO 800 / ISO 5,000, offers tremendous flexibility. When working at ISO 5,000 in a dark environment, much more information appears in the frame. If it is too much, you can reduce the sensitivity. You have to choose the main sensitivity, depending on the light of the scene: for example, ISO 800 outdoors-day, and ISO 5,000 indoors-day/night or outdoors-night.
This flexibility forces the cinematographer to test the different creative possibilities it offers. In my case, I like to work with this model at ISO 2,000 or 2,500, starting from ISO 5,000 for interiors and outdoors at night. But, as I have already pointed out, the camera allows a repertoire of sensitivities that requires study for each project or scene.
But let’s not fool ourselves, although noise at ISO 5,000 is very friendly, it is somewhat higher than at ISO 800. However, it is so manageable that it is not embarrassing or rash-inducing, as a colleague might say. To each his own.
The following images show examples of shots taken with different sensitivities.


Having this flexibility is also very convenient in situations where you don’t have as much material available. It allows you to work with smaller light sources. For example, an 18 kW HMI, which we use to create a certain effect, it would be possible to replace it with a 12kW or 6 kW in the same scene conditions. Obviously this does not mean that you have to do it, but technically you could do it. You have to work on the scene as much or more than if the sensitivity were lower, but the elasticity of this sensor requires you to look and take note in the process.
Also the high sensitivity of the sensor allows you to extend the recording times at sunrise and sunset. The ‘witching hour’ can be lengthened as a result. Joking a bit, it is ideal for projects with Terrence Malick.
Another advantage of high sensitivity is that the projectors can be placed further away from the scene. This particularity is interesting because placing the lights out of the camera’s visual range allows to hide them and avoid possible reframing. As an example are the sequence shots recorded with steadicam, frequent in television series well known for their production level, where sometimes, I have been able to see some lighting fixture that has slipped into the scene itself because it could not be avoided. Especially in situations where it goes from outdoors to indoors. Obviously it is a mistake and I have to say that none of the series was Spanish, which says a lot and well of our professionals.
| Working at ISO 5,000 |
| More information in the table |
| Flexibility of light sources |
| Light sources farther away |
| Minimize or adjust equipment |
| Smaller fonts for fillings |
| Working with the shutter |
| Doubling the ISO without shutter |
| Extension of sunrise and sunset hours |
| Details in Contraluces |


With the V-Gamut color space, the warm and elegant skin tones are maintained, and in general, there is a warmth very much of the brand that comes from behind, from the historical models of the VARICAM nomenclature. In my opinion and being highly demanding, there is a slight tint towards magenta that passes very well, although it should not lose sight of it, as in other models of other brands that have that slight tendency towards green or yellow.
I found particularly interesting the consistency of the colors in the shadow areas where it is easier to pervert them if they are not sufficiently illuminated. And to top it off, the wide range and contrast of color in postproduction at both 5600 and 3200.


