Oct
Ok. I am officially sad. Despite my previous post. I don’t see people posting their Davinci “looks” on our site or any other site. come on colorists, don’t be isolationists, play with the other kids!
Will I give up? Nooooo….
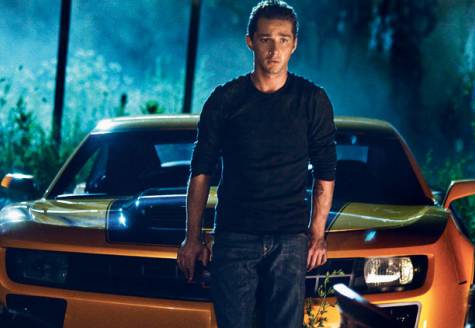
I bring you 2 variations of the same Teal & Orange look. For those of you who don’t know this look I recommend you to google the term “Teal & Orange Conspiracy” and you will see that it is currently used a lot, you have a great article about it here. A look so typical that there are even plugins focused only on it (Magic Bullet Mojo, coff, coff). Curiously the color system where I have managed to do it more easily and with better results is “COLORISTA 2”: its secondary system seems to have been programmed exclusively to achieve this effect cleanly and quickly (last week I published an article on how to do it in COLORISTA 2).
The basic idea is to highlight the color of the skins against cyan or green backgrounds by homogenizing all cold and warm colors in two absolutely opposite values on the sphere: thus generating a kind of very discreet duotone. In this way we manage to reduce the impact of chaotic colors on the scenery in case of poor artwork.
The 2 variations that I do alternately give priority to a more greenish or bluer homogenization. However, it is a look that often has to be adjusted shot by shot and you have to do a good job of “isolating” the skin tones in the shot.

And it also requires that the footage is not overly compressed. But Yoyi, if I work with DSLR!!!!
Coff, coff, I was counting on it….
In the looks pack courtesy of the house I also offer you one that is based on a technique widely used for formats with 4:2:0 or 4:2:2:2 sampling. The “CHROMA BLUR”.
It is based on separating the luminance information from the chrominance information in the image, then blurring the latter and rejoining these two elements. The resulting image should not vary appreciably from the original, but it is better able to withstand the more aggressive secondary selections. The idea is to place the CHROMA BLUR before the TEAL&ORANGE in the node tree.
A last application of the CHROMA BLUR look is, instead of blurring the node where the chroma info is, try applying SHARPENING on the first node where we have the luminance: this way you will avoid halos and other visual artifacts associated with sharpening.
Well, I want to see your looks next time I’m online. SHARE YOUR WORK, YOU DUMMIE!!!!
And of course you already know that if you want to learn how to create these looks in DaVinci you can do it in our advanced DaVinci Resolve course. And if you still don’t know how to use the software you can learn in our basic DaVinci course.
To learn how to install them in DaVinci you can read our previous tutorial